JANOME JW5622 Livret d'instructions
Naviguer en ligne ou télécharger Livret d'instructions pour Machines à coudre JANOME JW5622. JANOME JW5622 Instruction Booklet Manuel d'utilisatio
- Page / 32
- Table des matières
- DEPANNAGE
- MARQUE LIVRES
- Instruction book 1
- IMPORTANT SAFETY INSTRUCTIONS 2
- SAVE THESE INSTRUCTIONS 2
- TABLE OF CONTENTS 3
- SECTION I. ESSENTIAL PARTS 4
- Standard Accessories 5
- Extension Table 5
- Accessories Storage Box 5
- Free Arm Sewing 5
- CAUTION: 6
- Thread and Needle Chart 8
- Changing Needles 8
- To check the needle 8
- Setting Spool Pins 9
- Winding the Bobbin 10
- Threading Bobbin Case 10
- Threading the Machine 11
- Needle Threader 11
- Thread Tension Dial 12
- Drawing Up Bobbin Thread 12
- CAUTION 13
- Darning Plate 14
- Reverse Stitch Button 14
- SECTION III. BASIC SEWING 15
- Seam Guide Lines 16
- Turning a Square Corner 16
- Variable Needle Position 16
- SECTION IV. UTILITY STITCHING 17
- Tricot Stitch 18
- Knit Stitch 18
- Straight Stretch 19
- Rick-rack Stretch 19
- Sewing Buttons 20
- Automatic Buttonhole 21
- Corded Buttonhole 23
- Zipper Application 24
- Blind Hem Stitch 24
- Smocking 25
- Shell Tuck 25
- Applique 26
- Box Stitch 26
- Decorative Stitch 27
- SECTION VI 28
- MAINTENANCE OF YOUR MACHINE 28
- CAUTION: 29
- Troubleshooting 30
- 305-800-138(ENG) 32
Résumé du contenu
Instruction book
8vnmWinding the Bobbinz Pull the handwheel out.x Draw the thread from the spool. Guide the thread around the bobbin winder thread guide.c Ins
9zcxzxcvbvbThreading the MachineRaise the take-up lever to its highest position by turning the handwheel toward you.Raise the presser foot.Place a spo
10qerwtyThread Tension Dial• Correcttension The thread tension is adjusted depending on the sewing materials, layers of fabric and sewing meth
11qStitch Selector DialTurn the stitch selector dial to set the setting mark with the symbol corresponding to the desired pattern. q Setting mark
12Reverse Stitch ButtonAs long as you keep the reverse stitch button depressed, the machine will sew in reverse.Darning PlatePosition the darning plat
13w eqq Pattern selector: A/Bw Presser foot: Zigzag foote Thread tension: 2–6r Stitch length: 1.5–4t Stitch width: (0) or (5)SECTI
14q q Center needle position w Guide lines e NumbersSeam Guide LinesThe numbers on the needle plate indicate the distance between the center need
15w eqr t124350q Pattern selector: Cw Presser foot: Zigzag foote Thread tension: 2–5r Stitch length: 0.5–4t Stitch width: 1–5Zigzag Stitch
16Tricot Stitchq Pattern selector: Dw Presser foot: Zigzag foote Thread tension: 1–4r Stitch length: 0.5-1.5t Stitch width: 5This stitch is u
17This strong, durable stitch is recommended where both elasticity and strength are necessary to ensure comfort and durability. Use it to reinforce ar
IMPORTANT SAFETY INSTRUCTIONSWhen using an electrical appliance, basic safety precautions should always be followed, including thefollowing:This sewin
18q Pattern selector: Cw Presser foot: Zigzag foote Thread tension: 3–7r Stitch length: Anyt Stitch width: Adjust as necessaryy Darning plate
19Automatic Buttonholeq Pattern selector: (BH)w Presser foot: Automatic buttonhole foote Thread tension: 1–5r Stitch length:t Stitch
20b Depress the foot control to sew a buttonhole. The machine will sew the front bartack, left row, back bartack and right row automatically. Stop
21Corded Buttonholeq Pattern selector: (BH)w Presser foot: Automatic buttonhole foote Thread tension: 1–5r Stitch length:t Stitch wid
22Zipper Applicationq Pattern selector: A/Bw Presser foot: Zipper foote Thread tension: 3–6r Stitch length: 1.5-4t Stitch width: 5Pin or bast
23q w eqSmockingq Pattern selector: A/B and Dw Presser foot: Zigzag foote Thread tension: 1–4r Stitch length: S.S.t Stitch width: 5With
24Baste (or fuse with iron-on fabric joiner) applique pieces on the fabric.Stitch around the applique making sure the needle falls along the outer edg
25Decorative Stitchq Pattern selector: Iw Presser foot: Zigzag foote Thread tension: 1–4r Stitch length: 2−3t Stitch width: 5For a deli
26qweyrtuSECTION VI.MAINTENANCE OF YOUR MACHINECleaning the Bobbin Case and the HookDismantling Shuttle Race UnitRaise the needle to its highest posit
27Cleaning the Feed DogRemove the needle and the presser foot.Remove the needle plate setscrew and remove the needle plate. q SetscrewWith a brush, c
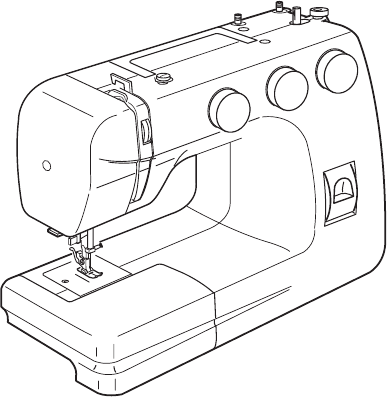
1SECTION I. ESSENTIAL PARTSName of Parts ... 2Extension Table ...
28TroubleshootingCondition Cause ReferenceThe needle thread breaks.The bobbin thread breaks.The needle breaks.Skipped stitchesSeam puckeringThe cloth
305-800-138(ENG)
2!6qrtyuio!0!1!7!8@0!9SECTION I. ESSENTIAL PARTSName of Partsq Pattern selector dial w Stitch length diale Stitch width dialr Bobbin winder stoppe
3wryqqetStandard Accessoriesq Bobbinsw Seam ripper/ Buttonhole openere Needle setr Automatic buttonhole foott Blind hem footy Zipper footu Darning pla
4Operating Instructions (for the U.S.A and Canada only)This appliance has a polarized plug (one blade wider than the other). To reduce the risk of an
5Presser Foot LifterThe presser foot lifter raises and lowers your presser foot.You can raise it about 0.6 cm (1/4˝) higher than the normal up positio
6Fabrics ThreadNeedle SizeCrepe de Chine, Voile, Fine Silk 9Lawn, Organdy, Fine Cotton orGeorgette, Fine Synthetic 11Tricot Fine Cotton Covered
7When inserting the bobbin case, place the horn into the recess of the hook race. e HornSetting Spool PinsThe spool pins are used for holding the spo
Produits connexes et manuels pour Machines à coudre JANOME JW5622
 (151 pages)
 (94 pages)
 (44 pages)
 (75 pages)
 (64 pages)
© 2020, manymanuals.fr. Tous droits réservés | 0.275 s |
 Manymanuals.com
 Manymanuals.de
 Manymanuals.fr
 Manymanuals.it
 Manymanuals.pl
 Manymanuals.cz
 Manymanuals.es
 Manymanuals-pt.com
Commentaires sur ces manuels